Showing posts with label line. Show all posts

Monday, February 4, 2013

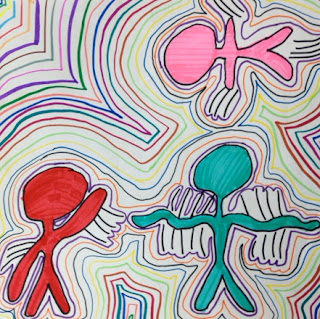
Keith Haring for kids

Yawwwwwn! Mondays are rough enough, but Monday morning after the Super Bowl? Fahgeddaboutit. While I really did not care about the game itself (I'm a STEELERS girl), I wasn't going to say no to a random opportunity for fabulous food with friends. And OBVIOUSLY Destiny's Child was going to reunite, so I had to see that. The commercials were so-so, though I did get misty over that sweet Clydesdale. And the power outage was interesting. Anyway, here's a project to perk you up!

I forget where I originally saw this project, or something similar that inspired this project. But it's been done all over the place, including here and here. I used to do this with fourth graders but this year bumped it down to third, and they are LOOOOVING it!

Keith Haring hails from Reading, Pennsylvania, so despite his fame coming from his time in NYC, this project fulfills our "study the art of a PA artist" curriculum requirement. Score!

We start by looking at Haring's kid-friendly works. The kids and I both particularly enjoy photos of Haring doing his subway drawings.

After I show the students how to 'beef up a stick figure,' they work on some sketches before working on their final compositions. This year, I went with 12" square paper.


Every figure is traced with black Sharpie before it is colored in with markers. This part usually takes us into the second day, when kiddos then use a variety of lines to outline their figures.


Those 'bumps' are supposed to be crossed arms. Mmm hm.


Keith Haring, third grade style. This project covers simple figure drawing, composition, repetition, rhythm, movement, variety... and general awesomeness.


By the way, for those kiddos who finished their last project early, I did a quick demo on this Bad Hair Day project so they'd have some practice with repetition, variety, and lines out the wazoo, which really helped prep them for this Haring adventure.

Tuesday, January 15, 2013

Bad hair day?

You've probably seen this project before. I recall finding it in another of my good ol' Arts & Activities magazine. You can see more (better) examples here and here, though I'll show the steps here for any sweet souls who've stumbled upon this for the first time. I highly recommend this project for shortened classes and sub days. We used it as a fun extra for kiddos who finished their previous project early. Essentially, kiddos do the following:

With a black Sharpie (for no smudges), draw a U-shape near the bottom of the paper (white paper is fine, though I've done it with bright colored fadeless paper and that is pretty rockin', too).


Choose a few (we use 5) different lines to 'grow' out of the U-shape.


Repeat each line at least 5 times.


Continue to add lines till all space is filled.


Add a neck, shoulders, and a face for a bad hair day!


This artist told me that her project got tired, hence the ZZZ's.

OR flip your paper over and turn your hairy head into a hairy beard!


Watch out--if you don't follow the proper steps in this order, you could wind up with... well, this:


This young man saw his project going downhill fast and self-corrected, re-starting to get it going the right way. We had a good laugh over his 'barfing man,' particularly because this student's mother is the school nurse and she sees far too much of this! He gave it to his mom after class and they titled it "Kid After Lunch," which I think is just a riot! Call me gross, but this is real life, people.

Monday, November 12, 2012

Jean Dubuffet Sculptures

For a few years, I've done an abstract project involving line, color, and sweet lil' second graders. Recently, I saw images of artwork by Jean Dubuffet that reminded me of said project. So this year, I've incorporated the two.

There are other Dubuffet lessons out there; I found the following before re-styling my own:

Dali's Moustache
Kids Artists
Hands, Head 'n Heart in the Artroom

Prior to seeing his work, I didn't know much about Dubuffet. If you're in the same boat, check out the following references that really helped me out:

Dubuffet.com
MoMA
Poul Webb Art Blog
Art Smarts 4 Kids

Here's what we did. First, we began by filling a 9x12" white piece of paper with a 'controlled scribble,' allowing our imaginations and our pencils dance around the page. The kids did this on both sides of the paper before consulting tablemates to choose their better side. Then, pencil lines were traced with a fine-tip black Sharpie. We erased any peek-a-boo pencil lines.


Kiddos colored a few spaces with the Sharpie, while other sections were filled with linear patterns using a white crayon.

Everyone's abstract shape was cut out.


Next art class, the watercolors came out and the artists went to work! Students were limited to two colors of their choice (like Dubuffet and his limited color palette). Some spaces were left white, while others got the bold color treatment.


When works were dry (within a few minutes), they were mounted onto paper. Glue stick glue was put on all edges of the pieces, but pushed down in select locations to create 3D sculptures, a la Dubuffet. They were THRILLED with their (simple) sculptures! And I have to say that I agree--the results are simple yet arresting.

Cutting a few of those black lines for more dimension


While we worked, we listened to a bit of music that Dubuffet had put together: http://www.ubu.com/sound/dubuffet.html The kids' reactions were quite entertaining!

This was a quick two-day project that gave us room to finish any previously incomplete projects (in this case, Gators), and fostered peer helping, as some kids 'got' it more than others. I look forward to finishing this project with my other second grade sweeties!